 What is a Wargame
A Wargame Test Drive : Turn 2: U.S. Combat Phase
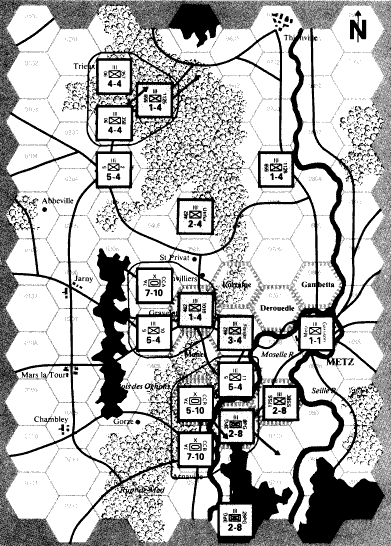
Turn Two: U.S. Combat Phase
The U.S. player will now make three attacks.
In the north, the 357th and 358th regiments will attack the German 1126th regiment.
This whole attack will be made on the plus seven column. Because the German unit is in the
forest, he shifts two columns to the left, thus making the attack on the plus three
column. The U.S. player rolls a two. The German player must retreat. The German player
retreats to 0502, and the U.S. 358th regiment advances. Now, there's an important
consideration here. The reason the 358th regiment advanced and not the 357th was because
if the 357th had advanced, the 358th, being now directly behind it, could not get adjacent
to the German 1126th regiment for next turn's combat. If the German player had retreated
to 0503 instead of 0502, the U.S. player would then have advanced the 357th regiment into
the vacated hex, so that the 357th could again move adjacent to the German unit for the
next turn of attack. The reason the German player did not retreat southward was because
this would have opened up a potential gap to the north which the Americans could have
eventually gotten through, and it also would have made the German unit vulnerable to
attack by the U.S. 2nd regiment in 0304 (which could have been moved into 0403). Thus, you
can see how the slightest movement in a wargame can have far-reaching implications, and
each move must be carefully considered.
The second U.S. attack is that of the combat command A and the 10th regiment against
the German 1010th regiment in 0507. This attack has a combat differential of plus 11. But
again, because the German unit is in a fortified hex, the attack is shifted from the plus
10 column, to the plus five column. The American player then rolls the die and has the
misfortune of rolling a six, which means that both U.S. units must retreat. combat command
A retreats to 0306 and the 10th regiment to 0307. At this point, one would not want to be
a member of combat command A, given its misfortune for being repulsed in two
consecutive attacks against two different German units. Equally strange and
unfortunate things happen historically, and this is a demonstration of how wargames are
able to simulate such events.
The third attack is against the German 8th Panzergrenadier regiment in hex 0609. The
attacking units (U.S. 11th regiment, combat command R and combat command B) have a total
differential of plus 15, thus resolving the combat on the plus 10 column. However, the
German unit is in a fortified hex, so the battle must be resolved on the plus five column.
A three is rolled. The German here must retreat. The German unit retreats to hex 0710, and
combat command R advances into the vacated hex at 0609.
The Americans were a bit more successful this time. They had successfully put a unit
across the Moselle River, and in the north are on the verge of breaking out into the open
terrain, thus assuring the seizure of Thionville. This will probably occur by Turn four.
At this point. the German success in the center, particularly in hexes 0505 and 0507, will
backfire, as the units holding these two hexes will then be outflanked from the north and
quite likely from the continued push by the American units in the south.
 Wargame Test
Drive : Turn 2: U.S. Movement Phase
Wargame Test
Drive : Turn 2: U.S. Movement Phase
 Wargame Test
Drive : Turn 2: German Movement Phase
Wargame Test
Drive : Turn 2: German Movement Phase
 Table of
Contents
Table of
Contents
Chapter 1
Contents